Product Description
6 Tier Maypole Cupcake Stand - It comes with the four small round plastic feet.
 The 6 Tier Maypole Cupcake Stand is our best selling 6 tier cup cake stand. It is held together by central rod fixed with screws for strength and stability.
Overall Size 400mm * Width 400mm * Height 525mm
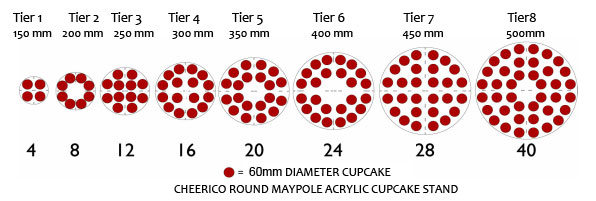
Capacity: approximately 82 cupcakes (based on 60mm diameter cupcakes)
# 1st,2nd,3rd,4th,5th tier is 4mm thick, 6th tier is 5mm thick
Rod Size : Diameter 30mm x 100mm Height
Tier 1: Dia 150mm
Tier 2: Dia 200mm
Tier 3: Dia 250mm
Tier 4: Dia 300mm
Tier 5: Dia 350mm
Tier 6: Dia 400mm
Rod Pillar Size : Diameter 30mm x 100mm Height
Packaging: Flat packed in cardboard carton, each component is protected with bubble wrap.
Contents:
Tier plates x 6
Rod pillars x 5
Screws x 6
Assembly Instructions: very simple and quick to assemble. Simply fasten each screw to the corresponding rod, there is no need for glue or other fixings/hardware. View this instructional video on how to put the Maypole Cupcake Stand together.;
Can be taken apart, washed and stored away for another time. This cupcake stand can be used as a 6 tier stand or you can remove the top plates and use it as a 5 tier, 4 tier, 3 tier etc.
Below you will find the diagrams for each of our stands telling you exactly how we arranged the cakes on to each tier.

Download Assembly instructions for Round Maypole cupcake Stand
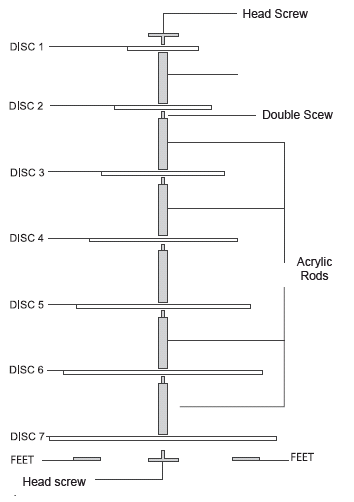
ASSEMBLY GUIDE:
 Parts: Acrylic discs, head screws, double screws, acrylic rods and acrylic feet.
* Remove the manufacturer’s protective cover from BOTH side of each acrylic component.
* Begin by placing the feet to the underside of the bottom disc ensuring they are evenly spaced.
* Take a metal head screw and place it on to a flat surface where the stand is to be constructed
* Carefully line up the hole(s) of the largest disk with head screw ensuring the disc is resting securely on the acrylic feet.
* Now screw the first rod onto the screw thread of the head screw making sure the acrylic disc is clamped firmly between two components.
* Continue by placing the next largest disc on to the screw thread of rod and tighten each piece as you go.
* The final rod is to be used as the supposed for the top tier and the stand is completed by adding the other screw cap into the top.
CARE GUIDE:
* The stand is made from acrylic which will scratch if it is not looked after properly.
* To clean the product use warm water with a little washing-up liquid and soft cloth.
* Do not use any abrasive cleaning products as they will make the acrylic.
* Do not put the stand in a dishwater


